Thursday, September 29, 2016

Adding ELA to Computer Lab

My school is very focused on ELA (English Language Arts) right now, so I wanted to add some ELA components to my computer lab lessons.  I was finally able to do this in week 4, once we began typing!

I began by teaching my students how to open a Microsoft Word document (I have a whole unit on Microsoft office later, so I don't address any shortcuts or tool usage here).

I gave my 3rd, 4th and 5th graders a writing prompt: If you could invent one new subject to study at school, what would it be?

Notice my underlined words? The word "one" circles? There were also arrows drawn to the beginning capitalized letter and the ending punctuation.  This is because those things are key!  I want them to pick ONE (and only one) NEW (not ELA, math, PE, Art, etc) subject.  I also expect every sentence to begin with a capital letter and end with a punctuation mark.  My students type at least four complete sentences and I read their response before they are able to move on to the next activity. For some students, the standard has to be amended. I have asked a student to verbally tell me his four sentences, then pick out one key word from each sentence for the student to sound out and type.

For my 2nd graders, I have them typing 5 sentences from the Dolch word 2nd grade list (provided by my school). I type the sentences and project them on the board and they just retype the sentences at their computer.

My 1st graders started by typing just sight words, 6 words, 5 times each.

My Kindergarteners at this point were still working on mouse skills...and opening and closing programs. I picked a different mouse control game for them and taught them again how to open a program, point their mouse, click their moues and close a program.  Guys, the first month of Kindergarten is rough...don't get discouraged...it gets BETTER, I promise.

You can find my actual lesson plan here.

Are you adding any ELA into your computer class? What are some different ways to add ELA and Math?  Do you have a writing prompt you just love?

Wednesday, September 28, 2016

Let's Type!

By the third week of school, I was getting into a nice groove and ready to start our typing lessons with everyone except Kindergarten.  My Kindergarteners still needed to learn to use a mouse!


 For Kindergarten, I went to abcya.com and chose a mouse skill game from the Kindergarten skills section. I chose Build a House, because I felt it would appeal to all of my students.  I used google chrome to place a short cut on each of my computers (this is a long and daunting task, I REALLY need to find an easier way!).  While we were all still sitting at my carpeted area, I showed the students how to use their mouse to point at the icon and double click. I then showed them all the tools in the game and how to use them. Finally, I sent each student to their computer to try the game on their own. I think I had to open the game for 95% of my students and I had some who could not use the tools.  I spent each class period walking from student to student to help them each complete one task. Kindergarten class seemed looooong this week, but looking back it was so worth it!

Also, since then, I have found a much better mouse skills game called Bees and Honey! It takes kids step by step through pointing the mouse where you want, clicking and then clicking and dragging.  I LOVE this game!

For my First and Second graders, I am using Dance Mat Typing from BBC. It is a fun game that teaches children touch typing using the correct fingers. It is music based and funny.  They love it!


For my Third through Fifth grades, I am using typing.com. Typing.com allows you to set up your own classrooms and student lists and give each student their own log-in....for FREE!  It allows you to run reports and track progress and keeps typing test scores. Wonderful, wonderful resource!

You can find my full lesson plan here.

Do you have any easier ways for putting shortcuts on computers?  Should I just get brave enough to let them navigate there on their own?

Friday, September 23, 2016

The Emoji Project


The second week of school, I came up with an Emoji project for all 1st-5th graders.  I had them use Paint to design their own emoji and then asked them to use the text tool to type about themselves.


  • The emoji and the background color can't be the same
  • You have to type your name
  • 3rd-5th grade typed a paragraph about themselves
  • 1st and 2nd typed a sentence about themselves.
This was a great project because the students practiced:

  1. Opening programs using the start menu
  2. Selecting and using different tools
  3. Mouse Control
  4. Keyboarding
  5. Saving and Naming their work
  6. Closing programs
Now let's be honest, my first graders had a really hard time with saving and naming their work, so I ended up individually showing them how (also known as "doing it for them").  But still...It was a great learning experience for us all!  It also helped me learn a little about each of my students.

After they finished their emojis, I spent the next week moving them over to my thumb drive and organizing them by class.  Unfortunately our computer lab does not allow the students to save their work to a cloud or drive, it only allows them to be saved to individual computers.  So, it was a very tedious task to go to each of the 25 computers and pull off the students work.

Next, I used a free online collage maker ( I like fotor) to make a photo grid of only the emoji's of each class (I plan on using the text portion for another project later).  I then saved the photo grid to my computer and inserted it into a Word document.  At the top of the word document I have a # with the teachers name.

This is from a 4th grade class

I then printed and placed all of them on the wall outside my computer lab with the # of my school name.


It added a few more hastgags (#technology, #ComputerLab and #LearningIsFun) and managed to get this up just before open house!

It is now 5 weeks later and the students still love looking for their emoji as they are standing in line, waiting to come into computer lab.

Stay tuned to see what display I am doing with the written portion of the emoji project!

And if you want to see what my lesson plan looked like for the week, you can find it here.

What are some great computer projects you have done with your students?  Is there an easier way to get students saved work? Seriously, if there is...help a teacher out!

Wednesday, September 21, 2016

Computer Lab Rules and Procedures--The First Week Lessons

The time finally came....the first week of SCHOOL!  I am not going to lie, I was very nervous.  I had decided that the first week we would just talk about the computer lab rules, procedures for entering, leaving, etc and become familiar with logging in/out of our computers.  But what would my rules and procedures look like?  Hmmmm......


I scoured the internet looking for the perfect set of computer lab rules, and found several good examples, but none of them were quite perfect.  So I came up with my own set of rules (I am still working on making a fun printable for these)

  • No food, drink or gum allowed in the computer lab
  • No talking when the teacher is talking, or when one of our friends is talking to the class
  • We use a quiet voice when we talk
  • No printing (my lab does not have a printer, so the students would need to walk two halls over to get printed material)
  • Stay on task
  • Only go to approved sites and programs
  • Do NOT turn off the CPU or Monitor
  • All 4 legs of the chairs must stay on the floor (OK, so I added this one after the first week)
Now I needed classroom procedures for entering and leaving class.  I decided that I wanted my younger students (K-2nd) to go to a carpeted area in my room each day.  It is easier to do the group learning part of the lesson with out the distractions of a computer.  My older grades (3rd-5th) go straight to their chairs, but do not touch the computer until after the group learning portion.  Also, upon entering the computer lab EVERYONE gets hand sanitizer! About 600 kids come through the computer lab each week, so keeping our hands clean to not spread germs is a priority.  However, I do go through almost an entire (smallish) bottle of hand sanitizer each week.


As for leaving the classroom, we do Give Me 5:
  1. Save your work and close out of the program
  2. Put your headphones on your monitor, on the side it plugs into the CPU
  3. Straighten your keyboard and mouse
  4. Gather your material and trash
  5. Stand up and Push your chair in


I then call the room by sections to line up, once the students are lined up, I open the door to wait for their classroom teacher.  Once my door is open, I expect hallway behavior:
  • No talking
  • Hands to self
  • Feet still
  • Face forward
You can find my lesson plan for the first week here.
The information for drills is provided by my school. 
Every grade (well, Kindergarten doesn't come the first week in my district, so 1st-5th) watched this fun video:


My older students (3rd-5th) then reviewed the parts of the computer with this video:


And I started teaching my younger kids (1st and 2nd) the parts of the computer with this video:


Afterwards, I let the students free draw in paint.  This was great practice for learning how to open and close programs, find programs and learning about mouse clicks and mouse movements.

What mistakes did I make my first week?  I thought it would be a great idea to teach each grade level how to log on and off the computers.  The younger kids just COULD NOT handle it.  After the first week, none of my students log off the computer and I only have my 5th grade logging on each day. 3rd and 4th grades log in as needed.

What have I missed?  Is there something else I should have covered the first week?  


Friday, September 16, 2016

Computer Lab Planning and Organization 101

Once I had my computer lab decorated....sort of, I started really thinking about the things I want to teach and general organization.


The lady who was in the computer lab before me left me her plan book, and it was/is a great resource.  However, I teach computer and knew I would prefer to do my lesson plans electronically.  I decided to use Excel and set up a template with each grade and the time I have them each day.  (You can view and download my template here.)


Next, I started thinking about what I wanted to teach in what order. I have decided to break my year up in the 4 nine week segments we have.  The first nine weeks will by computer parts and typing, the second nine weeks will be Internet and Social Media (safety, research, etc), the third nine weeks will be all about Microsoft Office and its applications and finally the fourth nine weeks we will delve into some basic coding and other special interests.  I should note here, that my state does not have an elementary computer curriculum or standards, so I am pretty free to teach what I want as long as my principal agrees.  At the request of my administrators, I will factor in ELA and skills that will be useful for testing.


After I had a blue print of what my year will hopefully look like, I literally started to panic over not knowing the 600 kids names that would come to my computer lab EACH WEEK.  Seating chart!  I needed a seating chart.  I used Microsoft word to make a template of my lab by using the shape tool to make rectangles and then I fill in each students name once it is printed. (You can find my template here.)  For the beginning of the year, I have sat the students boy/girl as much as possible. I find this seating arrangement cuts down on disruptive behaviors.


Because I have an affinity for binders, I KNEW I would be using a binder, so I bought a nice orange 1 inch binder during the back to school tax free event in my state.  I also bought divider tabs.  At the front of my binder, I have that weeks lesson plans and then a tab for each day of the week. I have each classes seating chart and class list (provided by my school) in the order they visit me each day.  In the front binder pocket, I also keep the red/green cards my school uses for fire/tornado/evacuation drills and my current to-do list.  In the back I also keep a copy of the schools master schedule and any other documents I may need.  I literally flip two pages each class period and only need to grab this one binder if we ever evacuate/have a fire drill!


I also created class lists with in Excel (can you tell I'm an Excel junkie?) to keep up with attendance, pull outs, behavior problems etc. Now, I'm going to be honest...this wasn't actually done before the beginning of school, but I had started the project. (I think entering each student is TOTALLY worth it, especially since I plan to still be here next year and can copy and past the students!)  I made once excel spreadsheet and have a tab for each teacher.  There is a place for notes (allergies, sped, etc) and then I make a column every week with the date I have the class and place an "X" for here, "P" for pull out and "A" for absent.  If I need to note that I had to change a students seat, administer a test, etc, I note that instead of my "code".  This lets me view the students by class or search for them by name or grade...it has proven EXTREMELY useful already! You can view my template here

And that is about as organized as I was when the school year started.  Next week, I will start posting lesson plans and resources, behavior tools and changes that I am making along the school year.  I hope to have you caught up to where I currently am by the end of next week!

How do you organize your computer lab?  Do you keep up with student data?  Any tips, suggestions or questions?


Wednesday, September 14, 2016

Um, What do I do with my class room?

I want to take some time to catch you up on my year up to now.  This will take several posts over the next few days, but I really think the journey is worth it.


I found out that I had the computer lab position the beginning of July.  Unfortunately, due to my summer job commitments, I didn't actually get the key and get to step foot into my lab until TWO weeks before school started.  That is not a lot of time!


I will admit my room is still not where I want it, but I did the best I could during those two weeks.  Unfortunately, I did not have much money to spend on my room, as I would not get my first school paycheck until September (Still waiting. That check comes tomorrow!)


I got to spend several hours with the old computer lab teacher, learning how to update the school website (That will be another blog post), and going over general class questions.  I was also lucky enough for her to leave me her old plan book!


I was very overwhelmed at first with just trying to wrap my mind around how I wanted to plan, organize and run my computer lab; so I focused mainly on decorating what I could.  I spent A LOT of time on Pinterest.  Like, I said...I had to do this on a budget...so I did not get to do a lot.  But, it was (and is) functional.


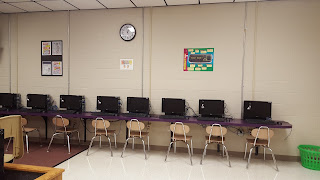
The previous teacher was nice enough to leave me two posters, plus I made use of the school supplied "posters" that have the school goals and mission.  Then I made 2 Pinterest inspired posters.

The first one was inspired by this pin from Teachers pay Teachers:

This is the inspiration, definitely not mine!


I bought a black piece of the thick foam board and foil pre cut poster letters from Dollar Tree and then used some green butcher type paper that is available at my school.  I think it turned out ok!


The letters look smudged in the photo because I used a glue stick to glue all the letters down and the glue ended up getting on the counter...and then on the next letter I glued.  I have now learned to put things I am gluing on paper that I can keep changing/moving. Don't worry, once it dried, I used a Clorox wipe to clean off the excess glue!


My other inspiration came from this pin from Teach the Bits and Bytes.


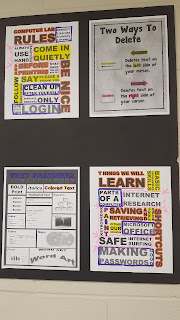
The Teach the Bits and Bytes blog has several great subway art type printables, but unfortunately...I don't have access to a color printer at school.  So I printed this and three other posters from the above site in black and white and used my highlighters and markers!  I mounted all four of them to a black foam board to make it look cohesive.  This is actually my favorite thing I did at the beginning of the year!


I also added a green Laundry basket ($1 at Dollar General) for two of my classes to put their lunch boxes in since they come directly to or from lunch.  This has already paid off BIG time.  A student's drink leaked out during class, but it was contained in the basket that was easily dumped and rinsed, instead of all over my floor!


I also brought in a few unused décor pieces from my home, just to finish off the room as best I could.


What are some ways you've decorated your computer lab or class?  Do you have a theme?  How much do or did you spend decorating? 


I feel I will add to the décor as the year progresses and be able to reuse everything next year!


Tuesday, September 13, 2016

Welcome- About Me

Hi! My name is Ms. Brooke and I teach computer at an elementary school in the south.  This is my first year and I decided to start this blog to chronicle my journey for myself...and if I can help out another teacher here or there, then GREAT!!


First, I will go ahead and tell you, I am not certified.  So if you are expecting this blog to be filled with theorems and such, you are in the wrong place. 


I also do not have a degree in computer science. I do not speak Binary very well.


But, I do teach computer and technology to a wonderful group of almost 600 elementary kids from kindergarten through 5th grade.  I do research my lessons and strategies and try to integrate ELA and math.


I hope you stick around for the journey!